Pages

Saturday, October 30, 2010

A Blast from the Past

While I'm busy prioritizing my next set of projects, I thought I'd share a few cards that I made right after I got my Cricut Expression in September, 2009.  Things have sure changed since I started scrapping with my Baby Bug on the dining room table two years ago. Last year I moved to the desk in one of the spare bedrooms and emptied a closet that was all shelving. I sure filled that up quickly.  Now, the entire room is filled, and I do mean filled, with all things scrappy. 
I'm glad I took pictures of my cards.  I can see my progress as a cardmaker and I have something to share with you :).
This was a sketch for Raq's card challenge.  I think that Accent Essentials snowflake is my all time favorite. I used the Divine Swirls Cuttlebug emboosing folder then inked with silver.  The stems are handcut.

Our Cricut Card Fairy Commander moved into a new home.  This was her welcome home card.  I love the Stretch Your Imagination bird house.  The bee and its trail is a Pez-a-doodle stamp and skittle.  The flowers are Walk in My Garden.

The monkey is stamped betweet two SYI trees.  The "coconuts" are skittles that I colored (they are light green) by shaking the clear ones in a baggy with a few drops of alcohol ink and then letting them dry.

Thanks for traveling down memory lane with me.

Hugs and Happy Crafting,
Larelyn

Wednesday, October 27, 2010

Altered Soda Bottles and More

I've been working on Halloween treats for some special kids in our lives.  The bucket is for our "almost" grandson, who is 9.  The bag is for his sister, a little more sophisticated at 14.  The altered soda bottles are for our two neighbor kids. 

I used Cricut Vinyl for the bucket images cut from Pumpkin Carvings, Paper Doll Dress Up, and Lyrical Letters.  I found that I had to set my blade and pressure at 2 so that I didn't cut through the vinyl backing.


I used Basic Grey Element Stickers for most of the decorations on these soda bottles.  I also used the MS DrippyGoo punch on the paper border.  I hope they have fun trying to figure out how to get the goodies out of the bottles!

And for my teenager, I found this great paper by My Mind's Eye that only needed her name and some ribbon added.

It's always fun to do something a little extra for those special kiddos in your life.  I hope they enjoy their treats.

Hugs and Happy Crafting,
Larelyn

Monday, October 25, 2010

Super Simple and Ready to Mail

I pledged 50 cards to the Holiday Cards for Soldiers Challenge.  I chose very simple designs that have lots of space to write and will be easy to mail.  I'll share a few with you and then off to the post office to send them to my central distributor so they can be on their way to our troops. 


Now it's time to catch up with some of the other card challenges and begin thinking about other holiday projects that I want to start.  I love this time of year.

Hugs and Happy Crafting,
Larelyn

Saturday, October 23, 2010

A Layout! Can You Believe It?

I went to a crop last night and finally completed a few more pages for my daughter's DisneyWorld Marathon scrapbook.  She wanted these pictures in the album to remember her stay at the Disney Jazz Inn. What a cute way to arrange the hand towels and washcloths.

Mickey's "jazz" hands were cut from Mickey and Friends as was the Disney heart.  The font and journaling tag are from Mickey Font

She visited Downtown Disney to pose for a few photos before returning to her home and job in Champaign, IL.  I'm sure there's a lot of pride in those smiles having completed her first (and last!) full marathon!  She's never been a runner, but she's an athlete and decided this would be an amazing personal challenge.

"Smile" was cut from Gypsy Wanderings.  The crown and septer is from 3 Birds on Parade.  I used my new I-Rock to set stones on the crown, septer, and to add bling to the princesses.

I'm asking all of you to keep Monique Griffith in your thoughts and prayers and she undergoes surgery this week.  She hosted the crop last night and displayed such a positive outlook.  There was laughter, jokes, and fun.  She is a beautiful person. 

Hugs and Happy Crafting,
Larelyn


Thursday, October 21, 2010

It's All Martha!

I just purchased the Punch Around the Page Eyelet Lace set.  These work wonderfully well as long as you follow the size recommendations that come with the punch instructions.  I made this card using this set, along with the Flower Stamp and Punch, and the Leaf punch.  It's all Martha Stewart.  The sentiment was heat embossed with clear embossing powder and the flower centers are Stickled (is that a verb?).  The punched frame is a 3.25 square which I scored and folded to look like a frame.


I'm busy packing for a crop tomorrow at the home of the amazing Monique Griffith.  She just returned from Philadelphia after meeting with one of the leading doctors in the field of Inflamatory Breast Cancer.  She is such a fighter and wants to ensure that she is doing everything possible to fight this monster that has invaded her body.  She is truly an inspiration.  I am in awe of everything she does.  If you haven't seen her work, check her blog at www.MonkeyDoodleCricut.blogspot.com.

Hugs and Happy Crafting,
Larelyn

Tuesday, October 19, 2010

Let the PAPER work for you

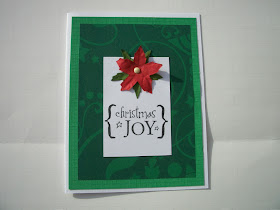
I don't always use die cuts and punches in the creation of my cards.  Sometimes the paper itself has everything you need to design something special.  I just bought DCWV Homemade Christmas and immediately fell in love with the entire stack.  In fact, I just went online and ordered two more!  Here's a card that I worked up just using some papers and images cut from that stack.

I also purchased DCWV Amber Autumn - some really great papers as well.  I love the unique autumn colors that went into creating this card.  Again, I just used images cut from the paper itself.

I'll admit it, I am a paper hoarder.  I LOVE, LOVE, LOVE paper and just can't seem to have enough.  Well, I have enough, I just keep finding more that I can't live without.  So, make the paper work for you - then you can go out and buy more!!!

Hugs and Happy Crafting,
Larelyn
Monday, October 18, 2010

Sweet Christmas Wishes

The Santa's Slackers Challenge is keeping me busy with Christmas card ideas.  A Gingerbread Man took front and center for challenge #7.  I'm liking the country feel of this card - a little different from my usual style. I may make more for my personal collection to be sent out this year.

This gingerbread man is from Just Because Cards.  I cut the shadow and two layers using the hide contour option on the Gypsy so that I could hand draw the face.  I didn't use the base cut because I didn't want the "cuts" that show you where to place the trim.  The tag and shadow are from George.  I inked all the edges with Versa Magic Jumbo Jave - my fave!  I also used Distressed Ink in Antique Linen to age the sentiment paper.  I found the cute little heart brads in my embellie stash, added a hemp tie which if frayed to the tag, popped the gingerbread man and that was it.

I have all my papers laid out for Raq's Challenge so I better get to creating.  And, yes, I treated myself to using all new papers - woohoo!!!

Hugs and Happy Crafting,
Larelyn 

Sunday, October 17, 2010

5 minute Christmas Cards

Sometimes I forget about the wonderful feature keys on the Cricut Cartridges.  Using the"card" feature on Joys of the Season is a terrific way to make Christmas cards in a jiffy.  My cards are very simple (hence the "5 minutes"), but you can dress them up and make something spectacular!  I sized mine on the Gypsy  (width-8.5, height-5.5) which, when folded will fit an A2 envelope.
Isn't this a great snowflake cut? I just added the sentiment with its shadow (same cartridge) and a snowflake dimensional sticker. 


I added a sticker sentiment, 3 punched berries, and some Stickles.

 
As I said, these are quick and simple.  When your project list is a long one, sometimes it's just what you need!
Hugs and Happy Crafting,
Larelyn

Wednesday, October 13, 2010

And the Winner is . . .

Congratulations, Glenda, you are the winner!  I used Random.org (which I can't seem to get a print screen shot in order to post the box - grrrrrr) and entered the numbers 1-79.  Number 51 was generated.  Then, going to my list of followers on my dashboard and beginning at the bottom (first who joined), moving right to left up the names, you were number 51 (wish I was still 51!).  Please leave a comment which includes your email address and I will email you a gift certificate to MySheriCrafts.  Hope you enjoy it.

For the rest of you, here is my thank you for joining my blog and keeping me encouraged to continue this journey. 
This tag card was welded in Design Studio.  The tag is from Plantin Schoolbook.  The flower branch and layers were cut from Storybook, and the humming bird (cut 3 times and popped) and sentiment are from Lyrical Letters.  I used Perfect Pearls on the bird feathers, beak, and flower centers.

I love cardmaking and papercrafting and am so thrilled that you've taken the time to visit and leave comments.  I learn from each of you as I visit your blogs or admire your work on the messageboards. Once again, thank you, thank you!

Hugs and Happy Crafting,
Larelyn

Tuesday, October 12, 2010

A Thank You to my Followers!

OH MY GOODNESS!  I can't believe how the list has grown.  Thank you all so much for choosing to follow my blog.  I'm still  learning this blogging process and would truly appreciate any suggestions to make this little (ha-ha) project better. 

As promised,  a prize for one of you (and a HUGE thank you to the rest!). Wednesday morning, I will use Random.org to choose one follower to receive a $20 gift certificate to MySheriCrafts.  I'll post the winner by 9:00 a.m. pacific, so be sure to check back. Also, I hope you'll drop by Sheri's store and her blog.  She has some great things to offer and some terrific challenges as well.  And, if you go to one of her designer's blogs, you can get an additional coupon to make your prize have an even greater value - how about that!!!

I'll ask the winner to leave a comment following tomorrow's  post which includes an email address and I'll forward the gift certificate  right away. Then, just enjoy deciding what to purchase. Easy-peasy, right?

Hugs and Happy Crafting,
Larelyn

Monday, October 11, 2010

Roly Poly Snowman

My Thanksgiving Cards for Soldiers have been mailed so now I must concentrate on Christmas.  Thanks to the Santa's Slackers Challenge, I at least have my Christmas papers, embellishments, and stamps out where I have to look at them each day.  This card was a quick one I made for Challenge #6.  It's just three circles (2.5, 2.0, and 1.5), hand-cut "snow", MS branch punch, ribbon, chalk ink, two small black brads and a hand-cut nose - That's it!  Easy peasy.

I just need 4 more followers to reach 50!  That's so amazing.  I thank each of you who have joined.  When I reach 50, there will be a special drawing for my followers.  I'll share the details soon, so pass the word.

Hugs and Happy Crafting,
Larelyn

Saturday, October 9, 2010

So Blessed, So Thankful

Good morning.  I hope your weekend is off to a great start.  Today I'm sharing three Thanksgiving cards that I will be sending to the Cards for Soldiers project.  I have made multiples of each card, leaving the insides blank so that personal messages can be written.
The sentiment is heat embossed with clear embossing powder.  The Core-dinations paper is dry embossed with the Cuttlebug Pumpkin Harvest folder and then sanded.


This sketch is one of the Raq's Card Challenge sketches for this week.  I thought the bottom was too plain so I stamped it repeatedly with a maple leaf stamp using Momento Dew Drop Dye ink in Tangelo.


I scraplifted this idea from Diane at Capadia Designs using a different flower cut and adding a bow.  I used the Gypsy to size the flower (image, shadow background, and shadow from Home Decor).  A little inking and some Stickles finished the card.  I did add a cream insert since I chose the dark card base.

Wow!  I'm getting close to 50 followers.  I think reaching 50 would be cause for celebration and offering some blog candy.  What do you think?

Hugs and Happy Crafting,
Larelyn

Wednesday, October 6, 2010

Think Pink #2

     Here's another Breast Cancer Awareness card.  I just pictured the ribbon as the "O" in "HOPE" and went from there.  It's not often that the finished card actually matches the picture in my head, but this one came pretty close - woohoo!! 
     Tomorrow is chemo day for my sister-in-law.  I'm her chemo buddy and we'll be gone most of the day so I don't know if I'll have a new post ready.  I always take my Gypsy with me.  She loves exploring all the cartridges and then, when she gets tired, I start working on my challenge cards.
     This is a standard A2 card.  I used Mini Monograms for the scalloped squares and Lyrical Letters for HOPE, cut twice and then offset.  I also used a Martha Stewart border punch.  Foam squares added the extra dimension to the scalloped squares.


Thanks for stopping by.

Hugs and Happy Crafting,
Larelyn

Monday, October 4, 2010

Think Pink

Here is the first of my Pink October cards. I'll be submitting this one to the My Sheri Crafts challenge.  It's so wonderful that an entire month is dedicated to Breast Cancer awareness, but we must not forget to support those who are fighting the other types of devastating cancers as well.  My sister-in-law is fighting ovarian cancer and her husband has multiple myeloma.  Both of my parents died of cancer, so fighting this awful illness is near and dear to my heart. 

This is the screen shot of my Gypsy.  Sheila (aka She's a Sassy Lady) provides wonderful directions for making window cards and suggests we use a window frame from Fabulous Finds. (You can weld words or images to any frame, but not the inside of a solid shape). I wanted to weld "Hope" to the window and then place another one on top for dimension.  I also welded the window's shadow cut, sized the same as the window, so that the card, when folded, would be an A2.  The welded letters for "Hope" are from Songbird.  The butterfly is from Sentimentals.


Here's what the welded window cut looks like before folded or embellished.


I added paper to the iside as a base for the butterfly which shows through the window frame.  The butterfly trail was made using a 3-D Glaze pen which adds gloss and a little dimension.


I used foam squares to pop the butterfly and added tiny pearls to the antenae.


I adhered "Hope" to the window cut and added an EK Success border trimmed to fit the card width. The ribbon and pearls finished the card.

Check back during this month for more Think Pink ideas.
Hugs and Happy Crafting,
Larelyn

Sunday, October 3, 2010

A Potpourri of Cards

I'm back!  We had a wonderful visit with our family, but it was difficult staying away from my scraproom.  I have some challenge cards that are waiting to be cut and assembled. Until I'm caught up, I'll share some cards that were created at the beginning of this wonderful journey. It's Sunday night so I had to take the pictures indoors - sorry about the quality :(.  The first three cards were made before I discovered card sketches and card challenges.
I didn't have too many cartridges when this card was made.  I used Beyond Birthdays and George.

This is my first Tilda card using Prisma pencils and Gamsol.  I've found that I like using Copic markers better than the Prismas, so this card is one of only a few using this technique.   The flower is cut from George and the sentiment is Beyond Birthdays.  I also Cuttlebugged Tilda's background and inked the edges.

This is an anniversary card for my husband.  The Indie Art butterfly and heart are still two of my favorite cuts.  The initials are from Lyrical Letters and the love is from Home Accents.  I added Stickles to inside of the cuts.

This was my first Gypsy challenge card.  For the Gypsy challenges, we don't use sketches, but rather we're given different functions to use in order to better learn all the wonderful things that can be done with the Gypsy.  For this challenge, we were to "flip" an image (birds).  The frames are from Songbird and the birds and branch are from Home Decor, popped on the Cuttlebugged background.  I also added Stickles to the flowers on the branch.

Finally, a card with no Cricut.  The leaves are a Martha Stewart punch.  I added silk flowers with button centers.  Some paper layering, ribbon, and doodling finished the card.

Thanks for continuing to follow me on my journey.  I truly appreciate your comments and those who are willing to become followers.

Hugs and Happy Crafting,
Larelyn