Regina graciously sent me her School Borders . . .Printable Stamp Set to use in my projects. This is the first time I've used downloadable images and I will definitely use them again - just the image you need with the quick click of a button!!!
In these projects, you'll continue to see my love for layers and the simple design techniques that have become my "style!"
All patterned papers are from K*I. The cartridge used is Graphically Speaking p. 36
The inside cut is the Icon Blackout, GS p. 36 sized in CDS to 4.5x3.5
The sentiment is Celebrate with Flourish using base, shadow, and layers. The "Star Student" is from Regina's The Cutting Cafe - Back to School Borders Set.
The inside stars are from George cut in 1/2 inch increments. The sentiment is computer generated. Please see my August 31st post to learn how to easily transfer computer sentiments to your diecuts.
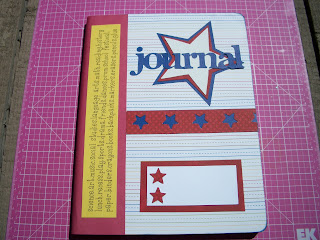
This altered composition book uses cuts from Graphically Speaking, p. 51 Type (journal) and Icon and Icon Blackout (star border). The stars are from George, again cut in 1/2 inch increments. The printed border is another of Regina's Back to School Borders.
I wanted to make a useful bookmark for the composition book so I used Potpourri Basket, p.62 Bonus feature for the pencil. I cut the base twice at 3 inches, using the hide-contour feature on the Gypsy for the one of the two cuts. I cut the layers (bonus - shift) 5 times to get all the colors for the layers.
Using another of Regina's borders, the bookmark is now a handwriting reference.
And here's the journal with its handy bookmark.
Before I send you on your way to Kisatrtle's blog, let me encourage you to find out more about Cricut Card Fairies. This group of volunteer cardmakers has sent over 650 card requests during the last two years. You can read more about us on the Cricut.com messageboard or contact our Commander, Crystal, by sending an email to cricutcardfairyarmy@gmail.com.
Thanks for hopping along. If you get lost or need to start again, you can go back to Crystal's blog or follow the list below.
Crystal http://crystalscraftycreations.blogspot.com/
GRKIDDO http://ginathorntonstamping.blogspot.com/
LYNNE http://www.scrapthiscraftthat.blogspot.com/
ScrappyJess http://scrappyjess.blogspot.com/
Kat/Bluerose http://katzdesignz.blogspot.com/
DDDCort http://www.dawnsaddiction.blogspot.com/
KarelJCreations http://www.karelj.blogspot.com/
SherylGreene http://sherylscraftingcorner.blogspot.com/
LarelynSartini http://www.handmadefromtheheart-designsbylarelyn.blogspot.com/ You are here
Kisatrtle http://www.kisatrtleskreativekorner.blogspot.com/
AJoy713 http://adreatravis2008.blogspot.com/
BeeJay http://www.beejaysstudio.blogspot.com/
Pamela http://blog.pamelaosterday.com/
Otherwise, click the link to Kisatrtle above (red link). Be sure to check back on Monday, Sept. 6 to find out the winner of my blog candy which can be seen in the August 26th blog post. All you need to do is leave a comment to become eligible. If you choose to become a follower, that would be wonderful too!!
Hugs and Happy Crafting,
Larelyn


