A place to share my papercrafting designs and encourage others to join in the journey.
Showing posts with label Gypsy. Show all posts
Showing posts with label Gypsy. Show all posts
Wednesday, September 26, 2012
Apples and Honey

Wednesday, September 19, 2012
Let's See Some Texture
I invite you to visit Cooking with Cricut to see more fantastic texture projects.
Be sure to link up your own project which shows texture and must include a Cricut cut.
Maybe you'll be chosen as one of our "Top Chefs."

Wednesday, September 12, 2012
I Feel the Love Project

Friday, April 1, 2011
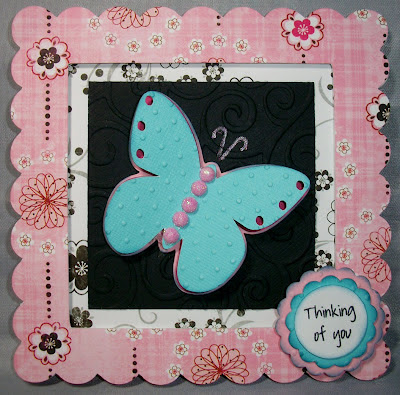
Rock Princess Butterfly
The butterfly on the Indie Art cartridge has always been my favorite, but I think it just got replaced. This butterfly is from Rock Princess and I think it's pretty darn fabulous!! The tag is from Gypsy Wanderings with a computer generated sentiment. The card is an A2 - my go-to size. Okie Ladybug shared that Staple's had A2 envelopes on sale so I stocked up - woohoo!
I've received several blog awards this past week. My blogging friends are so special and I truly appreciate the kind thoughts. I feel badly that I haven't passed them forward yet, but I will definitely share the love in the next day or two.
Thanks for stopping by.
Hugs and Happy Crafting,
Larelyn
Saturday, September 25, 2010
Another Challenge Card and Some Helpful (?) Ideas.
I'll begin by posting my 4th challenge card for Santa's Slackers. I used Very Merry Tags and an EK Success border punch. It's pretty simple, but I like the idea of the tag in the pocket (my rather far-fetched interpretation of the sketch!) and may explore some different ideas along those lines for more Christmas cards.
Well, those are my brainstorms for today. Hope you find them helpful. Now, I must stop organizing and get the creative juices flowing!
I really love to organize things - sometimes I organize more that I create!! Well - I have 68 Cricut cartridges (it was scary to actually count them) and I can't always remember what's on them, especially those wonderful bonus cuts found on the function keys. I do take the time to go through my handbooks, just to refresh my memory and find inspiration, but sometimes I just need a frame/mat and I can't remember which cartridge to use.
So this is what I did: I went through my handbooks with my Gypsy turned on and the 12x24 virtual mat selected. When I found frames/mats I knew I would use often, I selected them and placed them on the virtual mat. I used a default size of 2.5 so that I could compare across the cartridges I chose. I didn't include Mini Monograms because I'm very familiar with those shapes. After I filled up my virtual mats (2 pages) with cuts that I had been looking for, I used my Expression to draw the shapes using my Cricut Pens. That way, I'd have reference sheets with the cuts all together. I also added the initials of the cartridge following each set of cuts. It really didn't take that long and I love being able to look at my sheets to compare shapes and sizes and know which cartridge to use. Now, you may not want to use 12x24 paper. You could do the same thing on 12x12 or 8.5x11 and make smaller images.
A Reference for Frames/Mats
I added the note "&frames" after the Storybook images to remind myself of that complete function key.
The other thing I've done to help me with cartridge images is to print the preview pages from the Cricut.com website. If you go to "information" then "Cricut library" and click on the first column after each cartridge, you'll get a single sheet preview. You can't see the images created with the function keys, so I'll write what the function keys do and also write any "words" or "phrases" that come with the cartridge directly below the image. I keep all these pages in plastic sleeves and held together with binder rings.
Well, those are my brainstorms for today. Hope you find them helpful. Now, I must stop organizing and get the creative juices flowing!
Hugs and Happy Crafting,
Larelyn
Thursday, September 16, 2010
White on White - designed on the Gypsy
Today's card is for the Santa's Slackers challenge. When I saw the sketch I envisioned a white on white winter scene. I did add a touch of silver with the ribbon, stars on the trees, and the card mat. For dimension I Cuttlebugged (verb?) each tree with a different embossing folder, popped the center one and also popped the snowflake (Accent Essentials) which was cut from the same glitter paper as the background. I used George for the trees. On the Gypsy, I selected the triangle, copied it two more times, and then stretched each one to get the three sizes I wanted. I then copied each tree again. After I lined three of them up to fit the card width, I grouped and welded so that I'd have one solid base and three trees to cut separately. I also sized the two snowflakes on the Gypsy.
Here's the layout on the Gypsy screen. The gray lines on the grouped trees will not cut.
The finished card.
A close-up to show the embossing and dimension.
I love that I'm getting at least one holiday card completed each week. I've chosen several of the sketches to make multiples for Cards for Soldiers so maybe I won't be scrambling to get them completed on time this year.
As always, I'd love your feedback.
Hugs and Happy Crafting,
Larelyn
Subscribe to:
Posts (Atom)


