Showing posts with label Distress Ink. Show all posts

Thursday, February 20, 2020

Jaded Blossom February Release ~ Day 4 Sneak Peek

Hi Crafty Friends,
I hope you've been enjoying all of our Jaded Blossom sneak peeks so far.
Today we are sharing another new stamp set.
Here's my project.
For this project I used
Catch Your Dreams (NEW)
Rectangle Dies 1 
Rectangle Dies 2
Mini Tag Dies 3
Just a note on how I created this card cover.  I inked the cloud background using Distress Inks then sprayed it with Ink on 3 Pixie Dust.  I heat embossed the stamp image onto Heat Resistant Acetate then used foam tape to adhere the frame with the image onto the inked background.  The sentiment was also heat embossed onto gold metallic card stock.
Here is today's stamp set
Image may contain: text
Be sure to visit tomorrow (Friday) for our final new set and then again at 4:00 PM (PST) for our release week blog hop.  
All of our new release products will be available on Friday at 4:00 PM  PST
 at Jaded Blossom.

Sunday, April 22, 2018

Always Fun Challenges #55 ~ CAS (Clean and Simple)

Hi Crafty Friends,

For Always Fun Challenges this week, we're going Clean and Simple.

This is most often my style of choice.  
I wanted to try a new technique for my project.


I used a metal stencil (can be used for embossing or stenciling) and Distress Inks.
After taping the stencil onto my watercolor paper, I used a fingertip sponge dauber to apply the ink and a chalking tool to add the small areas of shadow.  Finally, I used a water brush to lightly blend each area.  When I removed the stencil, this is how it turned out.  I love this technique!  Being a stamp colorist, it's hard for me to color/paint without lines but I love the free look of water coloring.
This was a great solution until I get comfortable with this medium.

Just some matting and score lines for interest and I called it done.

Please follow the Always Fun link above to join our CAS challenge.

  
Photobucket

Tuesday, August 15, 2017

Challenge Reminder ~ My Besties International Challenge Blog


Hi Crafty Friends,

Today's post is just a reminder that you still have plenty of time to join
My Besties International Challenge for August.  The optional theme is Nautical.
Remember, you can use any image from any artist.  There will be prizes given to DT members and NON members.  So what are you waiting for?  Come on over and join the fun at
My Besties International Challenge Blog.

Here's my reminder project.

I used Besties Sailor Boy.  You can find the image HERE.

The design idea came from Simon Says Stamp Sail Away With Me Kit inspiration. I stenciled the background using Distress Ink and then stamped the waves from the SSS stamp set.  The sailboat was a die included in the kit.  Sailor Boy was colored using Copic Markers.

I hope you'll join our challenge!
Photobucket

Tuesday, July 2, 2013

Masculine and Vintage

 
Hello My Crafting Friends,
 
On July 1st  the summer/fall design team for Paper Crafting World was announced.  We are sharing a new format this term which will include individual postings featuring PCW digi stamps and cut files, tutorials, projects, and freebies along the way.
 
I have the privilege of creating the first post for this new format.
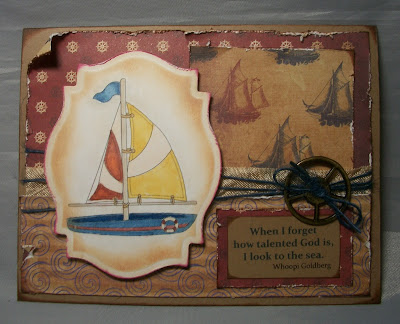
I found these fabulous Moxxie papers when I was in Texas and wanted to use them to create a masculine card using the PCW digi Sailboat.
 
The sentiment is a quote I found written by Whoopi Goldberg.  I think it's perfect for the essence of the card.
Because these papers have such a vintage look, I decided to use several distressing techniques to make the card come together.  Here's a close up to help you see the distressing.
 
I decided to share a few pictures that explain the techniques (in case distressing is new to you.)
 First I roughed the edges of the patterned papers using a single blade of my scissors.
If you slightly dampen the paper first it shreds a little more easily, but be careful not to over tear.
 
 Then my favorite go-to technique is to ink the edges and corners with chalk ink.
 
 A crimper adds some nice dimension.  I actually crimped the bottom section of the card.
 
 I often use Spellbinders dies to cut and mat my images.  After embossing, but before removing the image from the die, I use a fingertip sponge and Distress Ink to ink from the die inward to the edge of the mat.  When the sponge was almost empty of ink, I sponged over the entire surface to get a more vintage look.
 
Finally, the choice of Copic colors is important to attain the look I was going for.
None of these techniques are new or unique, I just thought I'd share the process I used to get the look that I think the papers called for.
 
I hope you'll plan to visit My Paper Crafting each day and see the Sizzlin Summer projects my fellow Paper Crafting World designers will share.
 
I would like to enter this card in the following challenges:
Cards for Men, "Boys will be Boys"
Crafting by Designs, "Anything Goes"
A.R.T.#3 " Anything Goes"
Crafts 4 Eternity " Heavy Metal"
QKR Stampede "Anything Goes"
Sister Act "Anything Goes"
 
Photobucket
 

Wednesday, September 19, 2012

Are You "Distressed?"

Well, I certainly hope not! 
 But how about your projects?  This week we're looking for projects featuring a distressed look, so join us at Delightful Challenges and show off your ideas.
 
I used two images from Digital Delights by Louby Loo's "Ahoy Matey Accessory Set,"and lots of tearing, inking, and sanding to get a distressed effect.
 
 
The sentiment is from K Andrew Designs' Pirates Tales and Fish Scales set.  I hand cut and banner.  I also used Copic markers and Distressed Ink.
 
Join us this week by linking your Distressed project to the Delightful Challenges blog.
Our sponsor this week is


Photobucket

Wednesday, August 1, 2012

BFF Bingo in Celebration of Friends Week

So glad you stopped by because today is a special Cricut challenge at Cooking with Cricut.  We are celebrating our BFFs!  To play along with us, just choose 3 items on the Bingo card - horizontally, vertically, or diagonally - and include them on your project.

Here's the Bingo card.

and here's my project using the Art Philosophy cartridge for the die cuts, one of the stamps that came with bundle, and ink (Distress Ink in Dusty Concord).  Ok, I'll admit to flowers and Stickles as well.  The card design is based on the one in the front of the AP Handbook.  Sometimes the sample projects are just too cute not to try.  The papers are all from the DCWV Chateau Lavendar Stack.


Come on and join our Cricut Challenge.  Just choose your 3 Bingo embellishments and create something special for your BFF.  Then link your project to the CWC Cricut Challenge.

Hugs and Happy Crafting,
Larelyn


Related Posts Plugin for WordPress, Blogger...