Tuesday, August 31, 2010

Computer Generated Sentiments and Your Diecuts

I had an ah-ha moment late last night.  I often use computer generated sentiments for my cards - some that I create myself and others from sources such as The Cutting Cafe.  I learned to print the sentiment first on bond paper, then adhere my diecut  or cardstock over the printed sentiment and print again.  My problem was that I didn't always get my diecut or cardstock properly placed and then the sentiment or digistamp would be off.  Ah-Ha!  What if I used graph paper for the initial printing???  Hmm, then I would have guidelines for placement.  Well, I tried it and IT WORKED!  Take a look:
I wanted to print one of The Cutting Cafe's Back to School borders on this diecut.

So, I printed it out on graph paper first (sorry about the picture quality).

Then, using the squares for measurement, I was able to lay the diecut over the image exactly where I wanted it printed.  I used removable double-sided tape to keep the diecut in place and placed the paper back into the printer.

And there you have it!  The image was printed exactly where I wanted it.

I hope my idea is helpful.  I always appreciate your feedback.

Hugs and Happy Scrapping,
Larelyn

Thursday, August 26, 2010

Get Ready for some Blog Candy!

Please join me during the Cricut Card Fairy Blog Hop September 3-5.  A blog candy winner will be randomly selected from those who leave a comment during the blog hop.  I'll post the winner on Monday, September 6 by 9:00 a.m Pacific Time.  Good Luck!


Remember that our blog hop is being sponsored by Regina from The Cutting Cafe.  She is providing 3 of her downloadable sets to one lucky winner who visits all the blogs during the blog hop.  Here's a sample from her Back to School sets.  These are from the borders set.  Don't they look fun? - great for cards or scrapbook pages.  I'm thinking about an altered composition book.  Hmmmm, you'll have to see what shows up on my blog September 3-5.

Monday, August 16, 2010

Loving those Layers

Even the simplest card looks more finished when you use layers.  So many Cricut cartridges have the shadow feature so it's really easy to add depth and dimension to your projects.  I also love to layer the patterned papers with different colored mats.  Today's cards all feature ways to use layers.
This card uses my go-to layout and the shadow feature with the notes and a mat with the patterned paper.  I also added some inking for additional depth.

The butterfly uses the shadow feature and I used ribbon to mat the patterned paper.

Notice all the layers on this card.  Each element has at least three layers including mats and shadow features.

The use of layering just makes all the elements on this card pop.

The only thing not layered is the sentiment.  The purple seemed to stand out better without the shadow.
Layering is a great way to make a simple card look detailed.

Thanks for visiting.  I'd love to hear from you.

Hugs and Happy Crafting,
Larelyn

Friday, August 13, 2010

Don't Miss the Cricut Card Fairy Blog Hop!!!

I'm so excited to be participating in my first-ever blog hop!  Join the Cricut Card Fairies September 3-5.  Besides seeing some great ideas for Back to School, you'll have many chances to win BLOG CANDY.  The hop is being sponsored by Regina from The Cutting Cafe and she is offering 3 sets of her wonderful downloadable images to one winner.  How can you beat that??  I'll be posting reminders as the date approaches.  I'll hope you'll plan on joining us.

Wednesday, August 11, 2010

Cards for Soldiers

For anyone who has the time, this is a most worthwhile cause.  About every 3-4 weeks, we are given a challenge (just to keep us inspired and help with our creativity) to create cards that our troops can use to send back home to their families/friends/loved ones.  When you join, you are not obligated to a certain number of cards or challenges: it's your choice when to participate and how many cards you are willing to send.  Cards are sent to a distribution person according to our time zones and then packaged and mailed to the troops. For all the information you need, go to www.Cricut.com/messageboard.  Look in the General Chit Chat forum under Cards for Soldiers.  The first post will give you all the information you need.

When I make my cards - I usually commit to 24 per challenge - I choose a design and then make 6 of the same.  I've found that I can get 6 A2 card fronts from one 12x12 piece of patterned paper so that usually works for me.  The challenge we're working on now is Romance - anniversary, miss you, love you, etc.  Here are the cards I'm mailing this week.
As you can see, the cards don't have to be fancy.  Most troops are not in a place where they can purchase cards to send home.  They are just so thankful to receive anything that you are willing to create.

It's a fabulous project.  I would love to have you join us.

Hugs and Happy Crafting,
Larelyn

Tuesday, August 10, 2010

My Go-To Card Sketch

I love finding or being given new card sketches and recipes.  When using them, I can concentrate on paper choices, embellishments, and cardmaking techniques.  Some of my most creative and complex cards resulted from having a card sketch or recipe to begin the creative process. 

Sometimes, however, (most times, actually) when I have a lot of cards to make - Card Fairy missions or Cards for Soldiers Challenges - I just need a go-to sketch; one that I know will be quick and easy.  That's what I'm sharing today.  These cards are basically the same sketch.  Each requires a background paper, mats, and a patterned paper.  You can see that the embellishments range from brads, to ribbon, to stick-ons, to clips.  Some use Cricut die cuts, others use stamps.  I've turned or arranged the elements with slight variations, but the layouts evolve from a common sketch.  This layout always seems to work for me.  I can dig through my scrap drawers and come up with something that looks good and can be completed quickly.


I look forward to your visits and your comments.

Hugs and Happy Crafting,
Larelyn
 

Saturday, August 7, 2010

Cards and Copics - a great team.

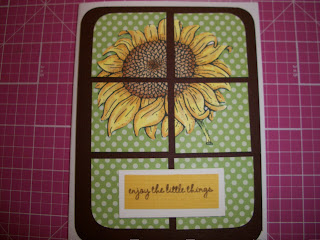
When I first began cardmaking, I couldn't decide which techniques I wanted to use.  I swore I would never become a stamper - ha, you should see my bins of wood mounted stamps and binders full of clear stamps and clings.  Guess I'll eat those words.  Then I saw examples of cards using Prisma pencils and Gamsol.  I gave that a try - SusieB is a master and provided wonderful inspiration.  I love how it looks, I just don't enjoy coloring with the pencils that much.  So, along came Copics - oooooh, I love markers and these are almost magic the way they blend. I just had to have them.  There are lots of technique tutorials on the web, but I just get out my color chart, my markers, and begin.  When I saw the sketches for Raq's Card Challenge this week, this card popped into my mind.

                                                             Here's how I did it.
First, I stamped my image on GinaK cardstock.  You need to use good quality, non-porous cardstock so that the colors don't bleed.  I use Momento Dye Ink in Black Tuxedo.  It dries quickly so that you can begin using your markers and the ink won't smear.
Next, using my Copic Marker Color Chart, I selected my colors.  I look for color groups of 2 or 3 markers that  blend from light to dark.  Sometimes I'll choose a contrast as well.  You can see my choices on the mat.  For the sunflower center I chose E31, E33, E35.  For the petals, I used Y02, YR23, and E43 - these were not in the same color group, but they gave me the effect I wanted.  For the stem I used YG00, YG63, and YG67.  When using Copics, you color in the area with the lightest color first, lay in the shades or contrasts, then go back and use the lightest again, blending all the colors together.
The last thing I did was cut out the Sunflower since I didn't want the background.

Here are a few more cards using Copic Markers to color the stamped images.  As you can see, I combine Cricut Die Cuts, stamps, Cuttlebug embossing, Nesties, and stamps.  I just LOVE it all.

I hope I've inspired you to try new techniques. 
Thanks for visiting.  I love comments, if you'd care to leave one.

Hugs and Happy Crafting,
Larelyn

Friday, August 6, 2010

Stickers on cards and some new toys!

Sometimes, when we get Card Fairy missions, we are told what the recipient(s) like.  When children have certain characters they enjoy, I try to make a card with that character.  Having stickers on hand makes the job quicker and easier, especially when I have several cards to make.  These cards were just mailed out today.


I also wanted to share two of my new toys.  The first is The Cinch.  I've been wanting to purchase a binding machine and HSN had this one at a really good price.  It's easy to use, but I'll admit that I had to watch YouTube to see how it was done.  The directions that came with the machine didn't tell me enough even though I'm pretty good at experimenting in order to figure things out.  I had it figured out, but the videos helped confirm what I thought.  What did we do before Google????

Finally, I bought my second Cricut Lite cartridge.  My husband is an avid upland and waterfowl bird hunter so when I saw Wildlife, I couldn't pass it up.  What you don't see on the box or the single page product preview is that there are phrases along with the animal and bird cuts. It's a really fabulous cartridge if you have a hunter in your life.  Now that I have The Cinch and this cartridge, an album might be in hubby's future.

Thanks for dropping by.  Hope you have a delightful weekend.  As always, your comments are so appreciated.

Hugs and Happy Crafting,
Larelyn

Tuesday, August 3, 2010

Love U card, and a mini-tutorial

I created this card for Raq's card challenge and the Gypsy Lazy Daze challenge, both on the Cricut message board.  Also, I need some romantic cards for our current Cards for Soldiers challenge, so this card fit the bill for everything.  How's that for multi-tasking?  I decided to try a picture tutorial, just to get the hang of it, so here goes:

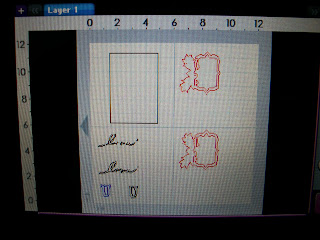
Using my Gypsy, I began with a 3.75x4.75 rectangle (George) for the background layer.  I added a Storybook frame - 2x3- and welded the leaf flourish - 2.29x2.36 then copied the image.  On the screen shot, you'll see "love" from Beyond Birthdays.  When I cut everything, I felt it was too fine, so I switched to "Love" and its shadow from Home Accents (a little creative license here), cutting them at 3.22x2.64 and 3.22x2.76 respectively.  I don't actually enter those odd sizes on my Gypsy screen.  I just add the image and then increase or decrease the size (a simple tap of the button) until it fits my design - that's the beauty of a Gypsy - you can make any size that works for your design.  The "U" and its shadow are both 1" from Storybook.

Here's the paper on the mat.  You won't see the paisley on the card.  I actually decided to turn it over and use the backside.  It looked better on the 4x5.25 background piece that I cut with my papercutter.


All the pieces ready to assemble.  Notice the Home Accents "Love"?  It just worked better.  I also cut an extra green frame so that I could pop the leaf flourishes after cutting the frame away.


A little inking on the card base, background, and leaves using VersaMagic chalk inks - love them!!!!


I used my Zig pen to assemble the pieces.  I often use Xyron, but I stuck (he-he) with Zig and my ATG 714 for this project. I decided to adhere the sentiment to the leaves first so I could use foam dots when placing that piece on the card to add dimension.

A few Kaiser Craft pearls to dress things up.


Adhere the assembled card to a folded 8.5x5.5 card base and you have the finished product.  This card was so simple that I'm sure a tutorial wasn't necessary, but it was a great learning experience for me. I'm not sure what's on the design screen for tomorrow.  I have quite a few cards to complete and there's always Raq's card challenge that's posted every Wednesday.

Thanks for visiting.  If you have time, please leave a comment or sign up as a follower.  Your support is so appreciated.

Hugs, and Happy Crafting!!!!


Monday, August 2, 2010

My First Blog Award!!

The fantastic and talented Sheila, aka, shesasassylady, was kind enough to pass along this blog award to 10 gals who are new to blogging.  She is just so kind, encouraging, and supportive of our efforts.  Be sure to visit her blog for some wonderful inspiration.

There are some "rules" of acceptance, however.  Besides passing the award on, Sheila asked that we share 2 reasons why we started a blog and why we will continue.
1.  I started a blog because I love visiting and learning from other papercrafters.  My hope is that someday I
    can inspire others as I have been inspired.
2.  I wanted to be able to join in the bloghops and the fun shared by the blogging community.
I'll continue to blog because I want to continue to learn and grow in my craft.  And, I just love all the wonderful people I've met as I travel this blogging road.  It's such a grand journey.

So, I'd like to pass this on to those who have helped me begin this journey:
http://www.thescrappingcat.blogspot.com/ (Carolyn)
http://www.scrappinnpiecemaker.blogspot.com/ (Michelle)
http://www.peachypapercrafts.blogspot.com/ (Peachy)
http://www.lifesgr8whnbugged.blogspot.com/ (Sue)
http://www.raqcreations.blogspot.com/ (Raquel)
http://www.sherrisllc.blogspot.com/ (Sherri)
http://www.aplaceformycards.blogspot.com/ (Jeannie)
http://www.217creations.blogspot.com/ (Elizabeth)
http://www.thebugbytes.com/ (Pam)
http://www.monkeydoodlecricut.blogspot.com/  (Monique)

Thanks, again, Sheila.  This is such a thrill for a newbie.
Hugs to all the inspiring papercrafters whom I've met in my blog and messageboard travels.

More album pages

I just finished more pages for my daughter's Marathon Album.  I'm sharing this two page layout because I can use it for My Shei Crafts Blog weekly challenge, which is FRIENDS.   This is such a simple layout, I'm letting the paper do the work! 


Related Posts Plugin for WordPress, Blogger...